 Click on Image to Download Manual
 In June of 1987 Atari was preparing to release a piece of hardware to finally give the Atari 8-bit computer a universal 80 column text display, something that many felt would make it more usable as a business machine. Unfortunately it didn't end up being quite the wonder box in reality as depicted by the July 1987 Antic magazine article (VOL. 6, NO. 3). Instead people began to complain about it being slow, and in later years having serious over scan issues on more modern TVs.
However in spite of its bad reputation, there were those that liked it, and found it useful for editing code in Basic, the Assembler/Editor, and MAC65, as well as others who would go on to write extensive documents in the 80 column word processor AtariWriter 80.
I was one of those people that opted not to buy the XEP80 when it first appeared in the stores, instead saving my money for the new XE line of computers and printers that had arrived just a couple years earlier, and were quickly dropping into my price range. However over the years that followed, I always wondered what it was really like to use one of these mystery boxes, and if they truly were as bad as I had heard.
Well just recently I got that chance thanks to Bob Wooley of SLCC fame, that not only had one of these in his Atari barn, but ended up giving me 3 of them in various states of disassembly, and/or modification. We played around with them on his test bench for a while, with only one of them actually working. But what I saw was a video solution that rendered very readable 80 column text even on the tiny 9" CRT that we had it hooked up to.
So I took my new found treasure home, and continued fiddling with the one that worked over the next several days, and also discovered what was wrong with the other two that hadn't worked (bad firmware ROMs). As I tried out various things, I started to really like the possibilities, although I wasn't loving the over scan issues on my LCD. But thanks to Avery Lee (aka AtariAge member phaeron) creator of Altirra the Atari 8-bit emulator, I discovered that he had written a utility called XEPVHOLD.COM that corrected the timing chain parameters in the XEP to work much better with modern monitors, and boy did it ever!
Now for the Project
So long story short, I thought this might make for a cool reboot project, and started investigating the availability of the main display processor chip being used on the board (National Semiconductor NS405). Well it was no big surprise that a chip used in a 30+ year old design would be obsolete, and only available as surplus stock or pulled from other equipment. But amazingly after a very short search I found a great source for pulled chips at an incredibly cheap price, and in large quantities from a seller on eBay. So I pulled the trigger and bought 200 of them. Hey I told you they were cheap!
Having gotten that problem out of the way, I proceeded to backwards engineer the XEP80 with the help of Jerzey Sobola's schematic. And although his XEP80 diagram consisted of what should have taken 2 or more pages to cover, but all crammed on to a single sheet, it was remarkably accurate, only missing a capacitor, resistor, and some inline RF chokes. Thus using his diagram as a starting point, I began the process of drawing up my own schematics (3 pages this time), and took the liberty of specifying HCT chips to take the place of the original 74LS ones as used by Atari, and replaced the old ROMs and SRAM with modern CMOS ones as well, with the goal of running this directly off of 5 VDC Joystick power (the original XEP80 used a 9VDC wall wart). My schematic is now done, but I'm not yet ready to release it until I've really proven it out.
Next I started laying out a PCB, and continued my testing, some of which related to an alternative video output circuit I was experimenting with. It was during this phase that I discovered I could get a very nice centered image on an HDTV by using one of those inexpensive AV -to- HDMI converters. In fact it really was quite amazing how good it looked. So at that point things took a turn, and I decided to see what would be required in order to incorporate one of those AV2HDMI boards into my project.
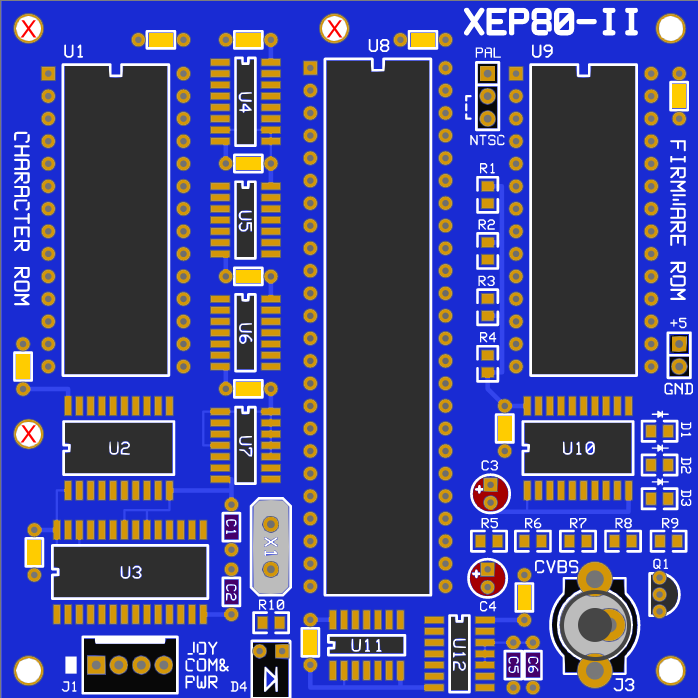
Here's a look at where this has taken me (the white circles with the red 'X' inside shows where the AV2HDMI board will mount).
However in spite of its bad reputation, there were those that liked it, and found it useful for editing code in Basic, the Assembler/Editor, and MAC65, as well as others who would go on to write extensive documents in the 80 column word processor AtariWriter 80.
I was one of those people that opted not to buy the XEP80 when it first appeared in the stores, instead saving my money for the new XE line of computers and printers that had arrived just a couple years earlier, and were quickly dropping into my price range. However over the years that followed, I always wondered what it was really like to use one of these mystery boxes, and if they truly were as bad as I had heard.
Well just recently I got that chance thanks to Bob Wooley of SLCC fame, that not only had one of these in his Atari barn, but ended up giving me 3 of them in various states of disassembly, and/or modification. We played around with them on his test bench for a while, with only one of them actually working. But what I saw was a video solution that rendered very readable 80 column text even on the tiny 9" CRT that we had it hooked up to.
So I took my new found treasure home, and continued fiddling with the one that worked over the next several days, and also discovered what was wrong with the other two that hadn't worked (bad firmware ROMs). As I tried out various things, I started to really like the possibilities, although I wasn't loving the over scan issues on my LCD. But thanks to Avery Lee (aka AtariAge member phaeron) creator of Altirra the Atari 8-bit emulator, I discovered that he had written a utility called XEPVHOLD.COM that corrected the timing chain parameters in the XEP to work much better with modern monitors, and boy did it ever!
Now for the Project
So long story short, I thought this might make for a cool reboot project, and started investigating the availability of the main display processor chip being used on the board (National Semiconductor NS405). Well it was no big surprise that a chip used in a 30+ year old design would be obsolete, and only available as surplus stock or pulled from other equipment. But amazingly after a very short search I found a great source for pulled chips at an incredibly cheap price, and in large quantities from a seller on eBay. So I pulled the trigger and bought 200 of them. Hey I told you they were cheap!
Having gotten that problem out of the way, I proceeded to backwards engineer the XEP80 with the help of Jerzey Sobola's schematic. And although his XEP80 diagram consisted of what should have taken 2 or more pages to cover, but all crammed on to a single sheet, it was remarkably accurate, only missing a capacitor, resistor, and some inline RF chokes. Thus using his diagram as a starting point, I began the process of drawing up my own schematics (3 pages this time), and took the liberty of specifying HCT chips to take the place of the original 74LS ones as used by Atari, and replaced the old ROMs and SRAM with modern CMOS ones as well, with the goal of running this directly off of 5 VDC Joystick power (the original XEP80 used a 9VDC wall wart). My schematic is now done, but I'm not yet ready to release it until I've really proven it out.
Next I started laying out a PCB, and continued my testing, some of which related to an alternative video output circuit I was experimenting with. It was during this phase that I discovered I could get a very nice centered image on an HDTV by using one of those inexpensive AV -to- HDMI converters. In fact it really was quite amazing how good it looked. So at that point things took a turn, and I decided to see what would be required in order to incorporate one of those AV2HDMI boards into my project.
Here's a look at where this has taken me (the white circles with the red 'X' inside shows where the AV2HDMI board will mount).

I decided to keep the analog video output as part of my design, and implement the AV2HDMI aspect as a daughter board stacked on top with it plugged into the CVBS video output jack. So first I had to extract the board out of one of those Chinese made converters being sold on Amazon and eBay for a very low price of $14-15 including FREE shipping.
The one I chose will convert either a CVBS (composite) or S-Video analog input to HDMI, and it also incorporates audio pass-thru to the HDMI output. The conversion of the Atari color video output into HDMI is less than spectacular when using one of these cheap converters, however in contrast the quality of the timing corrected XEP80 video looks quite remarkable - probably the best I've ever seen for the XEP80.
As it turns out, the board inside is very easy to extract, only requiring prying open a pressed together clam shell plastic housing. And conveniently it already comes with 4 mounting holes on its PCB, of which I was able to use 3 of them to mate up with my proposed XEP board design. The idea is to use 3 standoff's in order to clear the chips underneath. I don't plan on using the S-Video or audio inputs, but will retain them and tuck them inside whatever case is created for this project. They will be available as hackable possibilities for the end user to take advantage of if he or she so chooses.
So here's what that AV2HDMI board will look like mounted to my XEP80-II board.
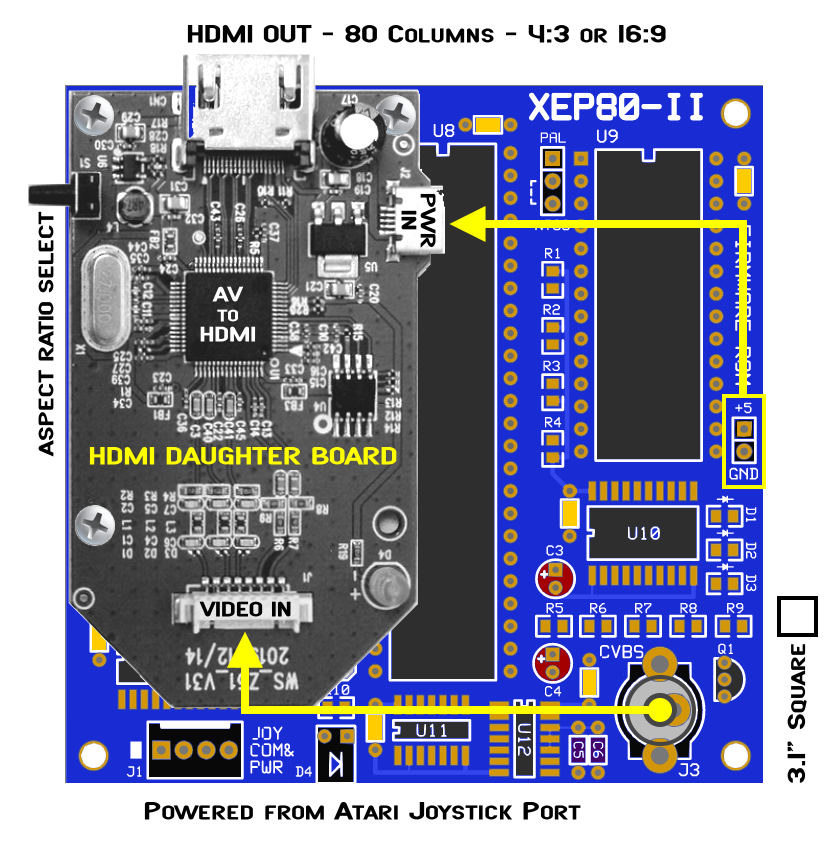
The AV2HDMI board will get it's power from my board, and require a modified micro USB cable to do it.
The yellow composite input lead for the AV2HDMI gets plugged directly into a mating RCA jack on my board, making it ready to roll. All that's required is to plug a custom joystick style cable into the computer, turn it on, and boot the XEP driver.
-----------------
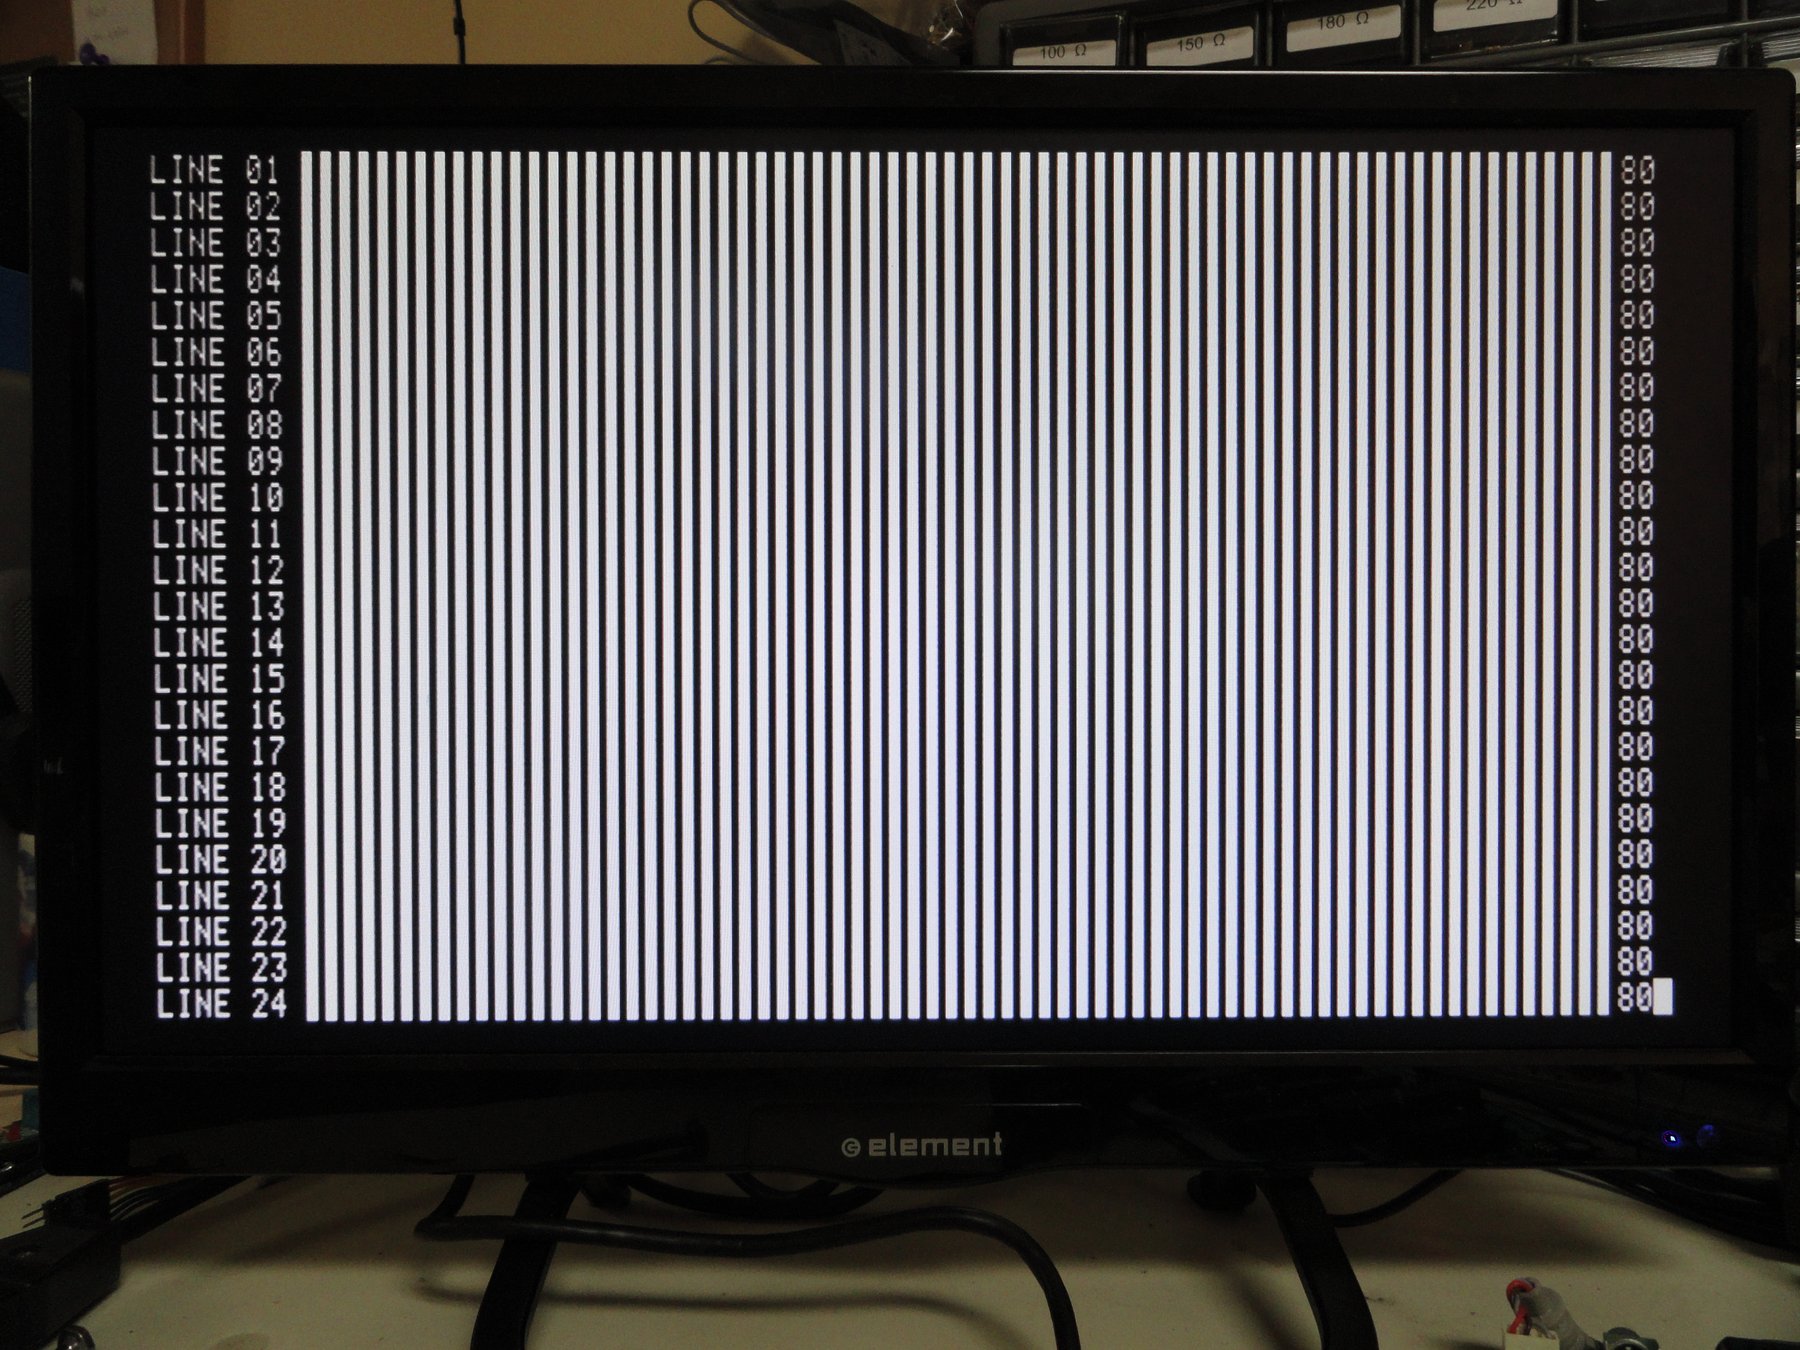
Click on the image to the right to get an idea of what this board combination can do on a modern HDTV when using Avery's modified video timing parameters and feeding through one of those Chinese video converters.
It's remarkably clear, with very legible text, and no distortions like one might encounter on an old CRT display. Basically this brings the XEP80 into the 21st century.
-----------------
My future plans are to incorporate Avery's XEPVHOLD parameters into the firmware ROM, assuming I can figure out how to do that. And since there are different requirements for PAL vs NTSC, I have implemented a configuration jumper that bank switches the firmware ROM, with the lower half containing code with NTSC parameters and the upper half having the PAL parameters. This way something like AtariWriter 80 will work correctly out of the box.
Well that covers it for now, but please check back for more news on the progress of this project.
- Michael
The yellow composite input lead for the AV2HDMI gets plugged directly into a mating RCA jack on my board, making it ready to roll. All that's required is to plug a custom joystick style cable into the computer, turn it on, and boot the XEP driver.
-----------------
Click on the image to the right to get an idea of what this board combination can do on a modern HDTV when using Avery's modified video timing parameters and feeding through one of those Chinese video converters.
It's remarkably clear, with very legible text, and no distortions like one might encounter on an old CRT display. Basically this brings the XEP80 into the 21st century.
-----------------
My future plans are to incorporate Avery's XEPVHOLD parameters into the firmware ROM, assuming I can figure out how to do that. And since there are different requirements for PAL vs NTSC, I have implemented a configuration jumper that bank switches the firmware ROM, with the lower half containing code with NTSC parameters and the upper half having the PAL parameters. This way something like AtariWriter 80 will work correctly out of the box.
Well that covers it for now, but please check back for more news on the progress of this project.
- Michael
 RSS Feed
