AtariBits
  • Home
  • Systems
    • 576NUC+ >
      • NUCplus4
    • 1088XEL >
      • XEL-CF Drive
      • XEL-CF3 Rapidus Variant
      • Accessories
      • XEL Archives
    • 1088XLD >
      • RGB2VGA-XLD
      • ARROW2JOY-XLD
    • CV-NUC+
  • TransKey
    • TK-II >
      • TK-II Manual
      • Installation
      • Device Compatibility
      • TK-II Archives
    • TK-II-STEREO
    • TK-II Control
  • XEP80-II
  • JOY2PIC
  • MOUSE
  • MIDI
    • MIDI 3D Printed Cases
  • UGV
    • Old UGV Archive
  • SDrive
  • RAM
  • Blog

CV-NUC+ a ColecoVision Mini Game Console (Part 6)

5/9/2023

 
Picture
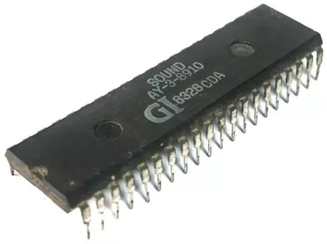
General Instruments AY-3-8910 Sound Chip
Which Sound Chip gets used for the enhanced MSX compatible audio in the CV-NUC+MSX Module?

When this project first started out it was going to be the General Instruments/Microchip AY-3-8910 which was originally created by a company called General Instruments in 1978.

It was widely used in arcade machines in the early 80's, and was also integrated into the MSX and ZX Spectrum home computers. And two of the size reduced versions made their way into the Mockingboard for Apple II computers.

Later in 1987 General Instruments spun off a new company called Microchip Technology which started producing the chip for a couple more years under its brand name, so it's common to see the chip with either GI or Microchip markings.

Around the mid 80's, it became available from Yamaha as the YM2149F under a license agreement with General Instruments. Although Yamaha made a few changes, one being a selectable clock divider which could allow it to operate from a 4 Mhz system clock, and they also added additional resolution in the internal volume envelope tables. This last part plays a roll in our decision of which chip to use.

Picture
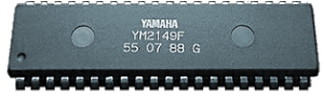
Yamaha YM2149F Sound Chip
Probably due to the Atari ST and MSX2 computers using the YM2149F chip as their main sound chip, as well as being the last such chip that was still in production in the early 90's, there appears to be quite a large supply of these being sold on the surplus market. Whereas the AY-3-8910 is in extremely short supply, and is often counterfeited, using a remarked YM2149F in its place (referenced in Part 4).

Because that counterfeiting is so common place, you are more likely to get a remarked YM2149F instead of an AY-3-8910 when purchasing the AY chip. And this is important since there will be a marked difference in how 'hot' the audio output will be when compared, with the AY chip being louder out of the gate due to the lower resolution audio control when interfaced as an AY chip.

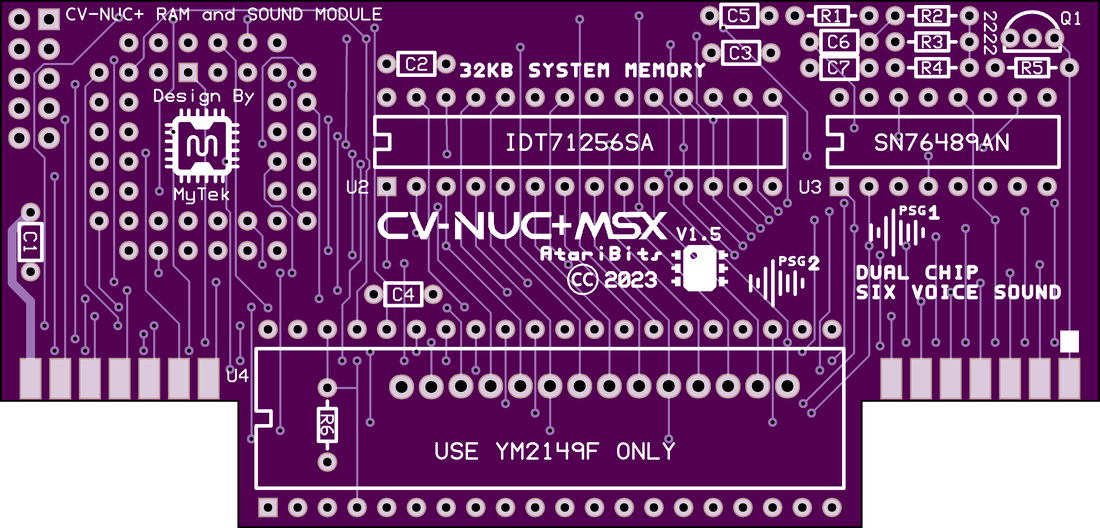
So a decision was made to spec the CV-NUC+MSX Module's 2nd sound chip as the Yamaha YM2149F since 9 times out of 10 that is indeed what you will get when purchasing from the surplus market (there are arcade parts suppliers that still carry genuine AY chips, but you'll pay quite a bit to get one). Sticking with the YM chip will insure consistent audio output utilizing the same audio processing circuit, with no need to have any configuration adjustments. And it also consumes half the power as compared to the AY-3-8910.

So on all CV-NUC+MSX production boards only the YM2149F will be marked on the silk screen as seen below. And this is the chip that should be purchased, which appears to be available from utsource at a reasonable price.

Picture

- Michael

CV-NUC+ a ColecoVision Mini Game Console (Part 5)

5/4/2023

 
Let's talk about the Case

The case for this cute little Colecovision clone has now been completed. And as Steve Jobs once said when he unveiled the Macintosh at the 1984 launch event, "insanely great" kinda fits how it turned out. I don't think I could've expected or gotten a better outcome.

I know it doesn't look at all like an original Colecovision, but then again this isn't your Grandma's game console. It's the 21st Century Baby!
Picture
The basis of this case design was the Atari 576NUC+ having the same footprint and only being 10 CM higher.

I cannot thank AtariAge member Mr Robot (Steve Boswell) enough for creating such a beautiful design, and also being kind enough to put the STL files in the public domain for others to download. Of course when I release this unit I will be sure to do the same.
PictureAnycubic Kobra Plus
Baby Steps

Since the generic design files that Steve released was essentially a blank slate, not having any holes other than the vents. I had to import his STL files into Tinkercad and get to work. So first order of business was to purchase a 3D Printer so that I could test my changes as I went. Not wanting to spend a lot of money on this aspect, I headed over to eBay and came across a listing for what appeared to be customer returned Anycubic Kobra Plus printers going for only $190 shipped. Although a bit risky I ended up purchasing one of these units.

A few days later it arrived packaged in what appeared to be its original box with all the foam inserts to cushion the individual pieces. And best part of all it still looked brand new.

About 2 hours later I had it unpacked, assembled, and ready to print -- or so I thought. Turns out it's Hot End was malfunctioning, but for $25 I ordered a replacement from the Anycubic website. Swapping out the new hot end for the defective one was extremely easy, and with that done the printer was now fully operational. Even factoring in having to replace a part and an ongoing Kobra Plus sale, I still saved $165 opting for this customer return unit vs. buying a new printer. So money well spent as far as I was concerned and I lucked out that something major wasn't wrong with the unit.

So next on the list was to integrate the required changes specific to the CV-NUC+ into the blank STL case design. This ended up taking just as long as I thought it would, meaning it wasn't easy. But after all was said and done I think it turned out quite well. And as it came together, I decided to do two variations of the Lid, one with a built-in keypad and one without.

Picture
PictureM3 x 3mm Brass Female Threaded Heat Set Embedded Nut Inserts
The idea behind the integrated keypad is to allow non-standard joystick controllers to be used such as those from an Atari or Sega Genesis. Since these particular controllers don't have an integral keypad, the built-in keypad could provide that missing aspect so that games could be started and number of players could be selected. The built-in keypad is scanned as controller #1, which works in a majority of situations. However there are some exceptions, such as Turbo that only recognizes a keypad on port #2. In that particular case we'll still unfortunately need a keypad controller to be present in port #2 to facilitate starting the game.

Anyway I'll leave it up to the end user to decide which lid to use for their CV-NUC+. With both lid versions to be included in the STL upload coming down the road. And for the keypad version, you will require a complete CV-KEYPAD Module as well.

You'll Also Need Some Other Stuff

I don't plan on doing a formal BOM for the case, but suffice it to say there will need to be a few fasteners to tie it all together, and some feet to give it stability, so I'll briefly try to describe what is required in this blog post.

To make the overall case a little bit more robust for assembly and disassembly, the case Lid was designed with Heat Set Threaded Brass Inserts in mind. These are typically pressed into place using the tip of a hot soldering iron.


Check out these YouTube videos if you are unfamiliar with how to properly install Heat Set inserts.

To be perfectly honest I have yet to do this myself, but as soon as I have some inserts on hand I do intend to give this a whirl and see how well I can do it.

One possible source for these is Amazon, but you'll end up with a 1000 of them (a lifetime supply), although at a fairly cheap price. Perhaps share some with  another DIY buddy.


Note: I think I'd prefer using the inserts being shown in the video below, because of that centering shoulder.
Picture
Amazon Link
Picture
Something Screwy Going On

As for screws to hold the lid to the base, it looks like M3 x 35mm long pan heads would likely be the ticket in either Stainless Steel (SST) or nickel plated steel.

In order to mount the PCB board to the base via the holes in the Cartridge Edge Card Socket, I used 4-40 x 3/4" long SST flat heads that I happened to have on hand, with two KEPS Nuts to secure it. Of course the metric equivalent could likely be substituted (M3 x 20mm).

To secure the keypad to the Lid, I used four 2-56 x 3/8" long SST flat head screws and standard nuts to secure it (with a dab of Locktite). Once again this could probably have metric equivalents substituted (M2 x 10mm). And although I used flat heads, this did require a countersink tool to create the chamfer first. Pan heads would probably be a better way to go, not requiring any additional prep.

As you can probably tell by now, nothing is truly set in stone when it comes to the fasteners.


Don't Forget the Feet

Now you don't want your little NUC to slide off the table or scratch it's bottom, so you gotta put some self adhesive feet, or sometimes called bumpers underneath its base.

I picked mine up from a local Home Depot Hardware Store, made by a company called EverBilt (P/N: 158437), but they can also be ordered online. I got the clear 3/8" diameter ones which are supposed to not mar or discolor the surface they are sitting on, and being self adhesive makes it super easy to apply them to the case.


Picture
BTW, There Could be a Burr or Two

Depending upon your printer, there can be a burr that gets created on each end of the extrusion towards the front of the base that regulates how far forward the PCB can sit behind the front panel. If that burr isn't removed (I use an Xacto to trim it) it can interfere with getting the back panel of the case to fit.

So if you find yourself fighting with getting that panel in place, or you have succeeded but there is a definite outward bow, then you got burrs my friend and they need to be removed.


Well I think this is a good place to end this post. However there is a lot more to come, so stay tuned for the next blog post on this miniature Colecovision system.

- Michael

    Author

    My name is Michael St. Pierre and in the early 90's I decided to create my very first Atari 8-Bit upgrade. It was called TransKey.
    ---Then soon after Atari folded and I left the scene ---
    25 years later I came back with a mission to improve upon what I had started so long ago.

    Archives

    October 2025
    May 2025
    March 2025
    January 2025
    December 2024
    September 2024
    August 2024
    July 2024
    May 2024
    April 2024
    February 2024
    January 2024
    December 2023
    November 2023
    August 2023
    June 2023
    May 2023
    March 2023
    January 2023
    December 2022
    August 2022
    May 2022
    April 2022
    December 2021
    October 2021
    July 2021
    June 2021
    May 2021
    April 2021
    March 2021
    February 2021
    January 2021

    Categories

    All
    576NUC+
    AtariBits News
    C64
    ColecoVision
    Industrial Applications
    Intro
    MIDI
    Monster 600XL
    Multi-Carts
    Multi-SLOT 1200XL
    NUCplus4 Assembly
    Transkey
    XEP80-II

    RSS Feed

Powered by Create your own unique website with customizable templates.