Let's talk about the Case
The case for this cute little Colecovision clone has now been completed. And as Steve Jobs once said when he unveiled the Macintosh at the 1984 launch event, "insanely great" kinda fits how it turned out. I don't think I could've expected or gotten a better outcome.
I know it doesn't look at all like an original Colecovision, but then again this isn't your Grandma's game console. It's the 21st Century Baby!
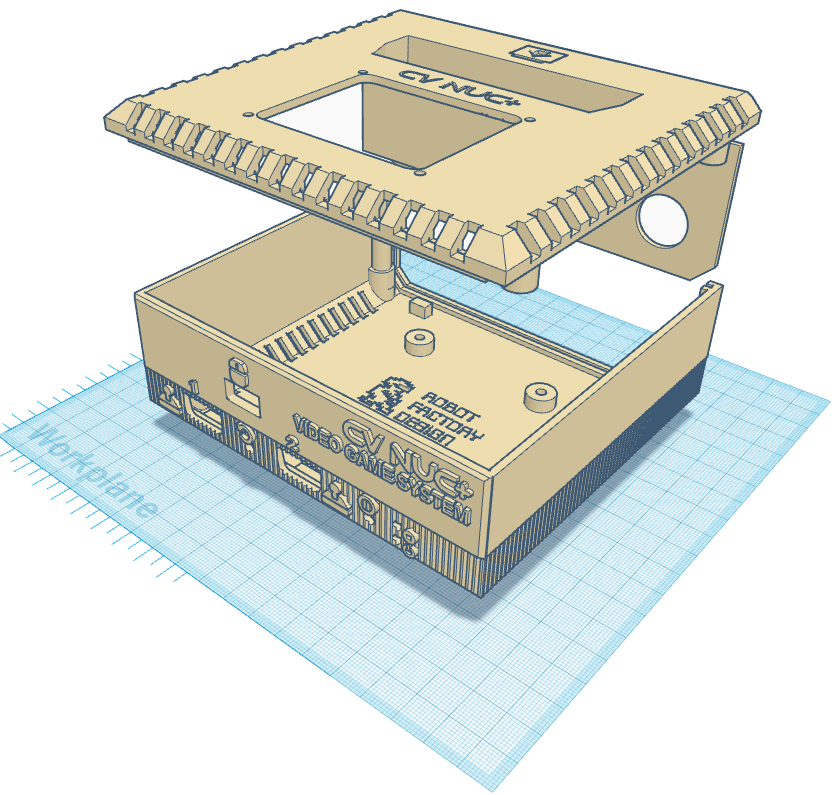
The basis of this case design was the Atari 576NUC+ having the same footprint and only being 10 CM higher.
I cannot thank AtariAge member Mr Robot (Steve Boswell) enough for creating such a beautiful design, and also being kind enough to put the STL files in the public domain for others to download. Of course when I release this unit I will be sure to do the same.
I cannot thank AtariAge member Mr Robot (Steve Boswell) enough for creating such a beautiful design, and also being kind enough to put the STL files in the public domain for others to download. Of course when I release this unit I will be sure to do the same.
 Anycubic Kobra Plus
 Baby Steps
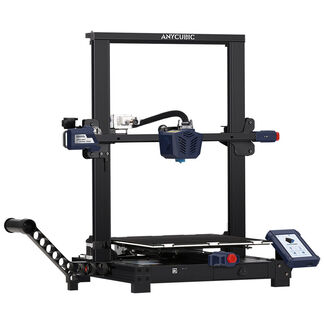
Since the generic design files that Steve released was essentially a blank slate, not having any holes other than the vents. I had to import his STL files into Tinkercad and get to work. So first order of business was to purchase a 3D Printer so that I could test my changes as I went. Not wanting to spend a lot of money on this aspect, I headed over to eBay and came across a listing for what appeared to be customer returned Anycubic Kobra Plus printers going for only $190 shipped. Although a bit risky I ended up purchasing one of these units.
A few days later it arrived packaged in what appeared to be its original box with all the foam inserts to cushion the individual pieces. And best part of all it still looked brand new.
About 2 hours later I had it unpacked, assembled, and ready to print -- or so I thought. Turns out it's Hot End was malfunctioning, but for $25 I ordered a replacement from the Anycubic website. Swapping out the new hot end for the defective one was extremely easy, and with that done the printer was now fully operational. Even factoring in having to replace a part and an ongoing Kobra Plus sale, I still saved $165 opting for this customer return unit vs. buying a new printer. So money well spent as far as I was concerned and I lucked out that something major wasn't wrong with the unit.
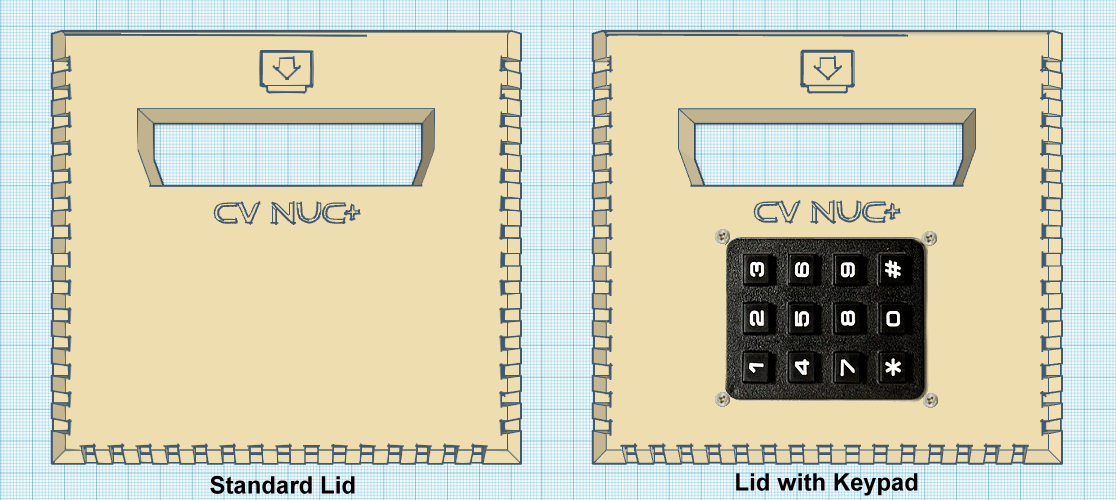
So next on the list was to integrate the required changes specific to the CV-NUC+ into the blank STL case design. This ended up taking just as long as I thought it would, meaning it wasn't easy. But after all was said and done I think it turned out quite well. And as it came together, I decided to do two variations of the Lid, one with a built-in keypad and one without.
Since the generic design files that Steve released was essentially a blank slate, not having any holes other than the vents. I had to import his STL files into Tinkercad and get to work. So first order of business was to purchase a 3D Printer so that I could test my changes as I went. Not wanting to spend a lot of money on this aspect, I headed over to eBay and came across a listing for what appeared to be customer returned Anycubic Kobra Plus printers going for only $190 shipped. Although a bit risky I ended up purchasing one of these units.
A few days later it arrived packaged in what appeared to be its original box with all the foam inserts to cushion the individual pieces. And best part of all it still looked brand new.
About 2 hours later I had it unpacked, assembled, and ready to print -- or so I thought. Turns out it's Hot End was malfunctioning, but for $25 I ordered a replacement from the Anycubic website. Swapping out the new hot end for the defective one was extremely easy, and with that done the printer was now fully operational. Even factoring in having to replace a part and an ongoing Kobra Plus sale, I still saved $165 opting for this customer return unit vs. buying a new printer. So money well spent as far as I was concerned and I lucked out that something major wasn't wrong with the unit.
So next on the list was to integrate the required changes specific to the CV-NUC+ into the blank STL case design. This ended up taking just as long as I thought it would, meaning it wasn't easy. But after all was said and done I think it turned out quite well. And as it came together, I decided to do two variations of the Lid, one with a built-in keypad and one without.
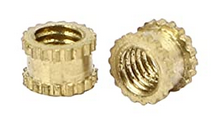 M3 x 3mm Brass Female Threaded Heat Set Embedded Nut Inserts
 The idea behind the integrated keypad is to allow non-standard joystick controllers to be used such as those from an Atari or Sega Genesis. Since these particular controllers don't have an integral keypad, the built-in keypad could provide that missing aspect so that games could be started and number of players could be selected. The built-in keypad is scanned as controller #1, which works in a majority of situations. However there are some exceptions, such as Turbo that only recognizes a keypad on port #2. In that particular case we'll still unfortunately need a keypad controller to be present in port #2 to facilitate starting the game.
Anyway I'll leave it up to the end user to decide which lid to use for their CV-NUC+. With both lid versions to be included in the STL upload coming down the road. And for the keypad version, you will require a complete CV-KEYPAD Module as well.
You'll Also Need Some Other Stuff
I don't plan on doing a formal BOM for the case, but suffice it to say there will need to be a few fasteners to tie it all together, and some feet to give it stability, so I'll briefly try to describe what is required in this blog post.
To make the overall case a little bit more robust for assembly and disassembly, the case Lid was designed with Heat Set Threaded Brass Inserts in mind. These are typically pressed into place using the tip of a hot soldering iron.
| Check out these YouTube videos if you are unfamiliar with how to properly install Heat Set inserts. To be perfectly honest I have yet to do this myself, but as soon as I have some inserts on hand I do intend to give this a whirl and see how well I can do it. One possible source for these is Amazon, but you'll end up with a 1000 of them (a lifetime supply), although at a fairly cheap price. Perhaps share some with another DIY buddy. Note: I think I'd prefer using the inserts being shown in the video below, because of that centering shoulder. | |

Something Screwy Going On
As for screws to hold the lid to the base, it looks like M3 x 35mm long pan heads would likely be the ticket in either Stainless Steel (SST) or nickel plated steel.
In order to mount the PCB board to the base via the holes in the Cartridge Edge Card Socket, I used 4-40 x 3/4" long SST flat heads that I happened to have on hand, with two KEPS Nuts to secure it. Of course the metric equivalent could likely be substituted (M3 x 20mm).
To secure the keypad to the Lid, I used four 2-56 x 3/8" long SST flat head screws and standard nuts to secure it (with a dab of Locktite). Once again this could probably have metric equivalents substituted (M2 x 10mm). And although I used flat heads, this did require a countersink tool to create the chamfer first. Pan heads would probably be a better way to go, not requiring any additional prep.
As you can probably tell by now, nothing is truly set in stone when it comes to the fasteners.
Don't Forget the Feet
Now you don't want your little NUC to slide off the table or scratch it's bottom, so you gotta put some self adhesive feet, or sometimes called bumpers underneath its base.
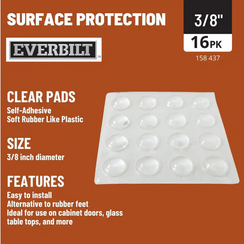
I picked mine up from a local Home Depot Hardware Store, made by a company called EverBilt (P/N: 158437), but they can also be ordered online. I got the clear 3/8" diameter ones which are supposed to not mar or discolor the surface they are sitting on, and being self adhesive makes it super easy to apply them to the case.
As for screws to hold the lid to the base, it looks like M3 x 35mm long pan heads would likely be the ticket in either Stainless Steel (SST) or nickel plated steel.
In order to mount the PCB board to the base via the holes in the Cartridge Edge Card Socket, I used 4-40 x 3/4" long SST flat heads that I happened to have on hand, with two KEPS Nuts to secure it. Of course the metric equivalent could likely be substituted (M3 x 20mm).
To secure the keypad to the Lid, I used four 2-56 x 3/8" long SST flat head screws and standard nuts to secure it (with a dab of Locktite). Once again this could probably have metric equivalents substituted (M2 x 10mm). And although I used flat heads, this did require a countersink tool to create the chamfer first. Pan heads would probably be a better way to go, not requiring any additional prep.
As you can probably tell by now, nothing is truly set in stone when it comes to the fasteners.
Don't Forget the Feet
Now you don't want your little NUC to slide off the table or scratch it's bottom, so you gotta put some self adhesive feet, or sometimes called bumpers underneath its base.
I picked mine up from a local Home Depot Hardware Store, made by a company called EverBilt (P/N: 158437), but they can also be ordered online. I got the clear 3/8" diameter ones which are supposed to not mar or discolor the surface they are sitting on, and being self adhesive makes it super easy to apply them to the case.
BTW, There Could be a Burr or Two
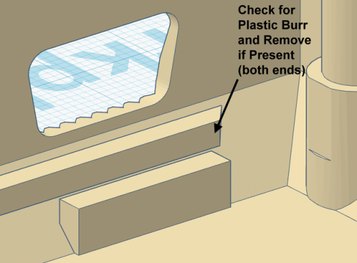
Depending upon your printer, there can be a burr that gets created on each end of the extrusion towards the front of the base that regulates how far forward the PCB can sit behind the front panel. If that burr isn't removed (I use an Xacto to trim it) it can interfere with getting the back panel of the case to fit.
So if you find yourself fighting with getting that panel in place, or you have succeeded but there is a definite outward bow, then you got burrs my friend and they need to be removed.
Well I think this is a good place to end this post. However there is a lot more to come, so stay tuned for the next blog post on this miniature Colecovision system.
- Michael
 RSS Feed
