AtariBits
  • Home
  • Systems
    • 576NUC
    • 1088XEL >
      • XEL-CF Drive
      • XEL-CF3 Rapidus Variant
      • Accessories
      • XEL Archives
    • 1088XLD >
      • RGB2VGA-XLD
      • ARROW2JOY-XLD
  • TransKey
    • TK-II >
      • TK-II Manual
      • Installation
      • Device Compatibility
      • TK-II Archives
    • TK-II-STEREO
    • TK-II Control
  • XEP80-II
  • JOY2PIC
  • MOUSE
  • MIDI
    • MIDI 3D Printed Cases
  • UGV
  • SDrive
  • Blog

TransKey TK-II-PBJ Incorrect Firmware Information

2/26/2021

 
Picture
Well what can I say other than I screwed up when I originally specified that the TK-II V2.4 firmware could work in the TK-II-PBJ board.
Picture
Picture
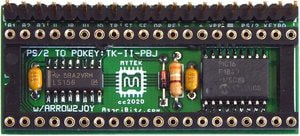
Click on Image to go to TK-II page
The reality is that this board can only use the newest V2.5J firmware due to the lack of connection to 4 of the 6 key scan counter bits on the Pokey chip. For a better idea as to why these bits are not connected on this particular TK-II board version please check out the ARROW2JOY-XLD page for the details.


All other TK-II boards besides this one and the ARROW2JOY-XLD can use either the V2.4 or V2.5J firmware, depending upon what features you want to have. See the Manual for more info on those differences.

Edit: I just wanted to add that the PokeyMax FPGA based replacement product might not be 100% compatible with the V2.5J firmware. So until that issue is completely resolved, it would be better to stick to an original Pokey when only V2.5J firmware is a possibility. Despite what you may see elsewhere (eBay), NOS Pokey chips can still be purchased for $20 from BEST Electronics.

- Michael

576NUC+ and FujiNet PCBs are ready to ship from China

2/23/2021

 
Just checked the JLCPCB site today, and the good news is that the boards have completed the production phase and are now awaiting pick-up by DHL.
Picture
Picture
Based on previous boards that I've gotten from them in the past, the shipping should only take 2-3 days. So if all goes well I should see them arrive no later than this Friday. Then comes the most exciting part of assembling and testing at least one of each over the weekend.

- Michael

576NUC+ FujiNet Interim Prototype

2/19/2021

 
Mr Robot had been seeing a persistent although random noise occurrence during deactivation of the FujiNet. This combined with the fact that I nor the other members of the beta test team were able to deal with the very tiny SMT parts being used on the last iteration of the NUC-FujiNet board design, set me up with a new project. This project turned into a mission about making some SIO to ESP32-WROVER interface circuit changes that had been in discussion for quite some time, hopefully solving the audio noise issue, while also creating a board that even I could assemble.
Picture
New Prototype NUC-FujiNet PCB
The reason for another PCB run in lieu of doing a point to point wired breadboard for prototyping  and proving out the changes, was that in this day and age of cheap PCBs, bread-boarding is no longer the best way to prototype designs. And although this board looks all the part of a final PCB layout, it really isn't, and only serves to hopefully advance the FujiNet interface circuit, as well as give me and others something we can actually assemble by hand, while furthering our education on how the NUC and FujiNet need to play together in the best possible way.

Why the odd shape and the bigger than needed board?
This board was patterned after the previous board designed by Mr Robot that is meant to drop into the 576NUC+, lining up the switches, LEDs and such with the front and rear panels of the custom NUC enclosures he's designed. Mimicking that previous board footprint insured that it could be used in a similar enclosure if so desired, and gave me lots of room to layout the chips and traces for a very easy routing of the PCB.

New Prototype SIO/ESP-WROVER Interface Schematic
Picture
nuc-fujinet_proto_schema.pdf
File Size: 51 kb
File Type: pdf
Download File

What has fundamentally changed in the interface circuit design, is that all SIO signals are now disconnected from the WROVER module via the the ON/OFF switch SW1, including the SIO Audio-IN. Isolation of all the WROVER digital outputs are still handled via a 74LS07 open drain hex buffer which has been retained from the previous design. However for all the WROVER inputs as well as the Audio output, they now get their isolation via a 74HCT4066 quad analog switch having all the individual analog switch enables also coming from SW1. So in all cases the SIO signals get disconnected either through the 74LS07 or the 74HCT4066 chips when SW1 is placed in it's OFF position.

Wherever possible, thru-hole components were implemented, making for a more DIY friendly assembly. Exceptions: the WROVER solderable module was retained instead of opting for a break-out version, since a few of us beta testers already had these on hand. And the SMT SD socket was also kept, although it's relatively easy to solder. Finally because there wasn't an appropriate thru-hole replacement for the USB Serial Bridge chip (CP2102N-QFN24), I opted to go with an external FTDI (USB to Serial) cable connection to facilitate WROVER programming. An even cheaper option for this cable is to be found in the PL2303TA based cables that sell for very cheap on eBay, essentially rendering a similar USB to Serial function, assuming the Prolific driver is installed (already present in most Linux distributions).

As I write this blog entry, sample boards are currently being manufactured by JLCPCB in China, and should be arriving late next week. When that happens, one board will get assembled and tested with the hopes that the new ideas it encompasses will actually work as proposed. Whatever is learned will then be applied to a final version of Mr Robot's FujiNet board.

Exciting times ahead,
- Michael

576NUC+ Keyboard Functions (Part 2)

2/7/2021

 
TKNUC V1.4 Firmware

Today I'll cover a bit more about the special function 'hot' keys when using the PS/2 keyboard with the NUC.

Picture
ACTION KEY(s)
Used in combination with the
following keys

Picture
SCREEN SAVER
Picture
XRAM MODE
Picture
VGATE MODE
Picture
NumLock MODE
Picture
KEY MAP SELECTION
The following functions are non-volatile in nature, meaning that whatever their last known state was, that will get retained between power-ups.

SCREENSAVER:   CTRL+ALT+S to toggle
                              ALT+S to view setting

Enables or disables the Atari 'attract' mode. When disabled (OFF) a CTR+SHIFT+A is sent once every 3 minutes to reset the attract timer. Normally this is considered a 'null' key send by the Atari OS and will be ignored.

XRAM MODE:    CTRL+ALT+X to toggle
                             ALT+X to view setting

Selects between two different extended RAM modes. Either 256KB Compy Shop, or 512KB Rambo. Compy Shop mode allows for separate CPU/Antic access to the RAM.

VGATE MODE:   CTRL+ALT+V to toggle
                             ALT+V to view setting

Toggles VGATE chip ON or OFF. When it's ON, over scan is limited to what would normally have been visible on a CRT screen, thus eliminating graphic garbage produced during certain games or demos in the bordering areas on wider screen displays (LCDs). The NUC also has an LED showing the present state of the VGATE chip, so you should see this turning ON and OFF depending upon the last setting.

NumLock:         CTRL+ALT+NumLock to toggle
                             ALT+NumLock to view setting

This toggles the power-up state for NumLock, which determines if the numeric keypad will either be in number mode or navigation.

Pressing the NumLock key without ALT, simply toggles the mode without saving or changing the power-up state.

Key Map:           CTRL+ALT+F4 to select
                             ALT+F4 to view setting

There are 4 key maps that can be selected.
  1. US  (United States)
  2. DE  (Germany & Austria)
  3. UK  (United Kingdom)
  4. A8  (Requires re-labeled ISO keyboard)
Each time the CTRL+ALT+F4 combination is pressed the next selection in line will be chosen, and when it gets to the end, it'll go back to the first one on the list. For more information on each map selection go HERE.

- Michael

576NUC+ Keyboard Functions (Part 1)

2/3/2021

 
TKNUC V1.4 Firmware

I thought I'd cover where things are at with the PS/2 keyboard 'hot' keys, and how the 576NUC+ is controlled by them.

First of all there is no actual power switch on the NUC, so that function gets implemented via special key press combinations which can be seen in the table below. Primarily this consists of using the 'ALT' key simultaneously with another key. Normally that would be a number key, although in the case of booting without a built-in language or game selection, the 'tilde' (~) key would get used, with CTRL+ALT+~ allowing a boot with a stock XEGS OS. Although in most cases the High Speed SIO OS with Fast Math routines active would be the way to go, via an ALT+~ key press.

When not pressed with the ALT key, the tilde key functions identical to the Atari inverse key.


Main Selection and Power Control Keys

Picture
ACTION KEY(s)
Used in combination with the following keys

Picture
POWER-ON KEYS
Picture
POWER-OFF KEY
KEYS
OS
LANG/GAME
SLOT
POWER
ALT+~
HSIO + FAST MATH
X
ON
CTRL+ALT+~
STOCK XEGS
X
ON
ALT+1
HSIO + FAST MATH
ALTIRRA BASIC
ON
ALT+2
STOCK XEGS
ATARI BASIC
REV C
ON
ALT+3
NA
PAC-MAN
ON
ALT+4
NA
STAR RAIDERS
ON
ALT+0
X
X
OFF
Help, Console and Reset Keys

Picture
These have been mapped in a similar fashion to the Altirra Emulator, and also share the same functionality with the Dark AKI firmware on Lotharek's newest PS/2 Keyboard Adapter product.
F1 = HELP
F2 = START
F3 = SELECT
F4 = OPTION
F5 = RESET

If the NUC is in a powered down state, momentarily pressing any of the console keys will latch it so that the next time you power-up it will be as if that key is being held down. Following power-up, the latched key(s) will get cleared. Also if you change your mind, pressing ALT+0 will clear it as well.

I think that's a wrap for now. In my next post I'll cover some of the other 'hot' keys, addressing things like extended RAM control and attract mode defeat.

- Michael

    Author

    My name is Michael St. Pierre and in the early 90's I decided to create my very first Atari 8-Bit upgrade. It was called TransKey.
    ---Then soon after Atari folded and I left the scene ---
    25 years later I came back with a mission to improve upon what I had started so long ago.

    Archives

    January 2023
    December 2022
    August 2022
    May 2022
    April 2022
    December 2021
    October 2021
    July 2021
    June 2021
    May 2021
    April 2021
    March 2021
    February 2021
    January 2021

    Categories

    All
    576NUC+
    AtariBits News
    ColecoVision
    Industrial Applications
    Intro
    Monster 600XL
    Multi-SLOT 1200XL
    Transkey
    XEP80-II

    RSS Feed

Powered by Create your own unique website with customizable templates.