Before I can truly finalize the system and have another set of sample boards made, I wanted to address a problem I was seeing in the video output where a very faint color snow was visible in the background. This also seemed to relate to the method by which I was conditioning the subcarrier output of the LM1889 Color Encoder chip with a simple one transistor emitter follower buffer. There was no inherit gain to this stage, so I had to resort to some trickery with an inline inductor to even have a somewhat reasonable color burst signal, although it was half of what it really should have been. Later I discovered that the inductor was responsible for the noise I was seeing in the chroma signal, and subsequently in the background of the image.
So back to the drawing board it was, with the that emitter follower circuit being changed out for amplification instead. Luckily this didn't require any more components than what I was already using, and I was able to get rid of the inductor at the same time (win-win).
Here's a look at the entire video circuit as it now stands, shown in two parts to better fit the page.

YPbPr Translation from the TMS9128 VDP chip's R-Y and B-Y outputs to a 3.58 Mhz subcarrier
The first part converts the TMS9128 VDP (not shown) R-Y and B-Y color difference signals into a single 3.58 Mhz subcarrier output suitable for the S-Video chrominance signal via the LM1889 color encoder chip, although that chip doesn't provide enough drive on its own to feed into a standard monitor input (we'll address that in part 2). In this particular application the LM1889 is only being used for its color encoder aspect which is half of its normal purpose. It also has an RF modulator section which was utilized by the original Colecovision game console as the sole means of connecting a TV.
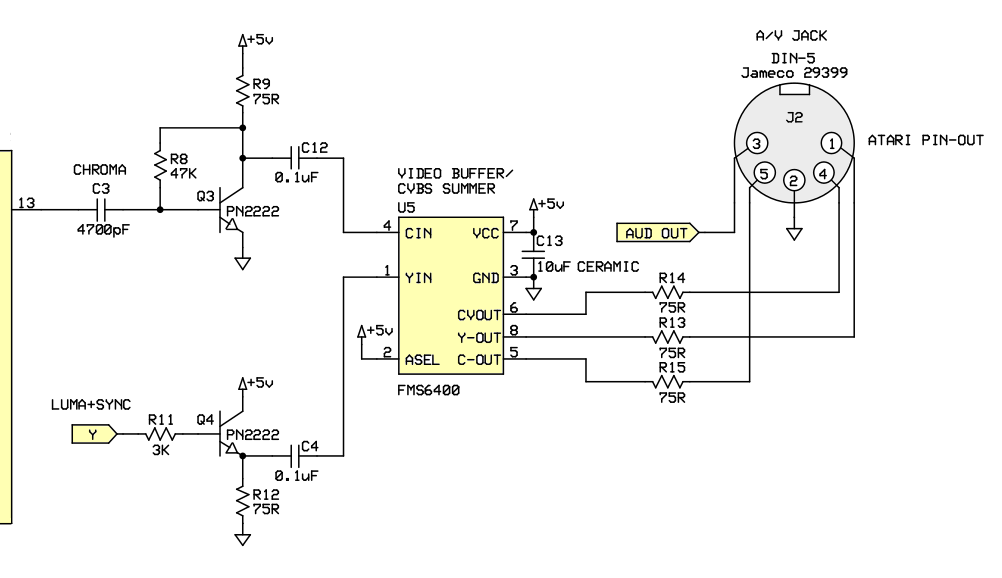
S-Video/Composite Driver Circuit
The second part of the schematic shows the final signal conditioning and driver circuit going right out to the Atari 8-bit compatible audio/video jack, with the FMS6400 outputting both S-Video and Composite Video. I chose to mimic the Atari connector and pin-out since there are standard cables already available with this in mind.
As can be seen, transistor Q3 is now serving to amplify the subcarrier output of the LM1889 to a level suitable for injection into the video buffer/combiner FMS6400 chip,
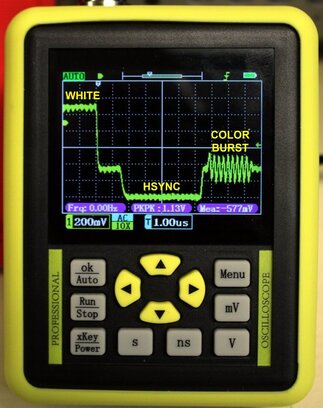
With the proper chroma amplification now in place, the color burst is at the correct level for standard video. This can be seen in the captured image of the composite video output being viewed on my hand-held O-Scope.
For this test, the composite output was terminated with a 75 ohm resistor to ground to mimic what would be the case for a video monitor if it were connected instead.
Normally the color burst signal is suppose to be at the same relative voltage swing as the sync pulse (350-400 mV), which we now appear to be doing thanks to the added amplification of the new Q3 circuit. The output of the LM1889 just wasn't sufficient with buffering only being applied. I think with these changes we're good to go on this aspect. and can now call it a day.
So after making the modifications, I put Donkey Kong Jr up on my VIZIO S-Video monitor and captured this un-retouched screen shot with my camera.
Captured image from 19" VIZIO LCD TV, via the S-Video input (taken with a Canon EOS Rebel T7)...
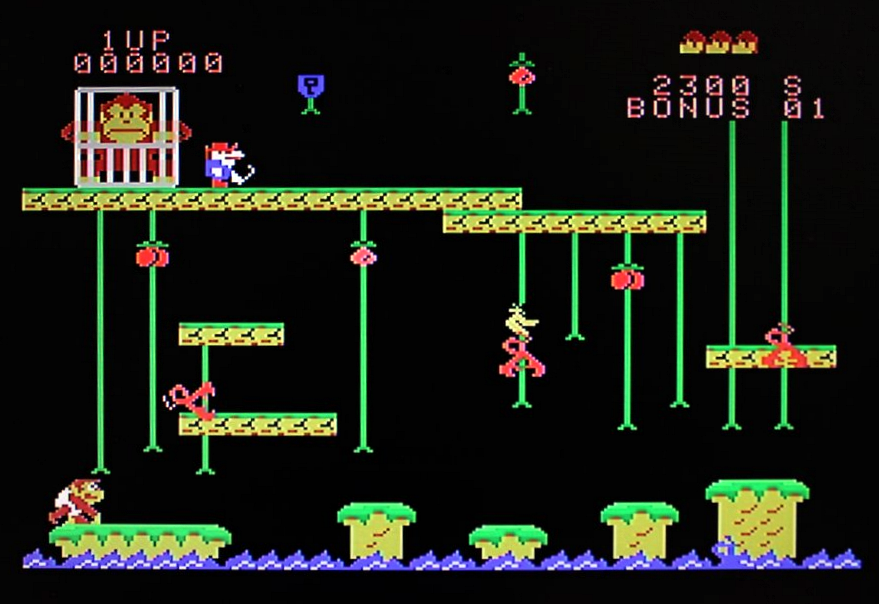
Finally the black background is flawless, with no evidence of noise or snow what-so-ever. And the detail and color saturation in the image are quite good at this point.
In order to get such fully saturated colors I did need to boost the color setting on my VIZIO for it to appear as it does in S-Video mode on the LCD screen. However all the other levels were set to 50 out of 100, being the default mid-point settings of that monitor. Later when I fed the composite output to my CRT monitor the color saturation was perfectly fine at the default settings for that particular monitor. I think this is partly due to the differences between how the LCD displays information vs. the CRT. A CRT display just tends to be more vibrant when compared to early 2000's LCD monitors like the one I'm using.
Update February 2nd 2023
I connected the S-Video output into a cheapo HDMI converter I picked up off of AliExpress and was literally blown away by the result when viewed on my large screen HDTV.
Captured image from 55" LG HDTV, via the HDMI input (taken with a Canon EOS Rebel T7)...

Click on Image to Enlarge
So I think I'm done monkeying around with the video (it's probably about time).
Stay tuned for Part 4 of this series where I will delve into some audio mixing changes that got implemented, some USB mouse discoveries, and hopefully a demonstration of what should be the final boards for this project.
- Michael

 RSS Feed
