
MOUSETARI™ PS/2 Mouse Interface Chip
When programmed with the MOUSETARI firmware, a Microchip PIC MCU turns into a PS/2 to Atari ST or 8-Bit (400, 800, XL, XE) mouse converter. And although originally intended for internal installation, it could easily serve external plug-in applications.
Features
When programmed with the MOUSETARI firmware, a Microchip PIC MCU turns into a PS/2 to Atari ST or 8-Bit (400, 800, XL, XE) mouse converter. And although originally intended for internal installation, it could easily serve external plug-in applications.
Features
- Microsoft Intellimouse PS/2 Input
- USB/PS2 Multi-Protocol Compatible
- Atari ST Quadrature Encoder Output
- Selectable Mouse-to-Joystick Porting
- Hardware Acceleration
- Hot Pluggable
- Planned Future Upgrade: changeable resolution (currently fixed at 400 dpi)
|
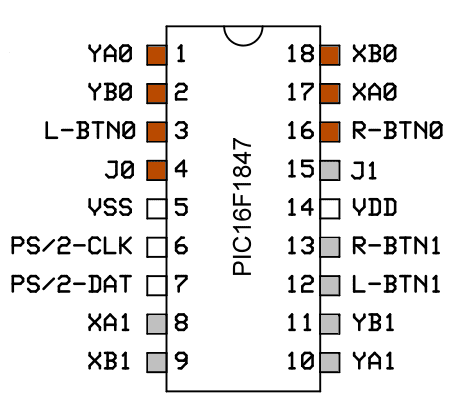
Programmed PIC16F1847 MCU Chip Pin-Out
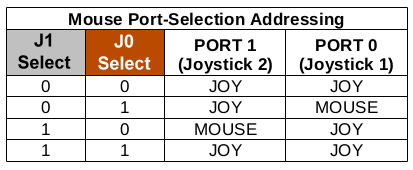
XA0 = Channel 1 Encoder XA Out to: Joystick 1 Pin-2 XA1 = Channel 2 Encoder XA Out to: Joystick 2 Pin-2 XB0 = Channel 1 Encoder XB Out to: Joystick 1 Pin-1 XB1 = Channel 2 Encoder XB Out to: Joystick 2 Pin-1 YA0 = Channel 1 Encoder YA Out to: Joystick 1 Pin-3 YA1 = Channel 2 Encoder YA Out to: Joystick 2 Pin-3 YB0 = Channel 1 Encoder YB Out to: Joystick 1 Pin-4 YB1 = Channel 2 Encoder YB Out to: Joystick 2 Pin-4 L-BTN0 = Channel 1 Left Button to: Joystick 1 Pin-6 L-BTN1 = Channel 2 Left Button to: Joystick 2 Pin-6 R-BTN0 = Channel 1 Right Button to: Joystick 1 Pin-9 R-BTN1 = Channel 2 Right Button to: Joystick 2 Pin-9 J0 and J1 = Joystick Port Selection to: Switch or Logic VDD = +5 VDC Connect to: Joystick X Pin-7 VSS = Ground Connect to: Joystick X Pin-8 Revised December 12th, 2018 -- fixed error for XA and XB connections For plug-in applications, J0 can be left unconnected (has internal pull-up), J1 gets grounded, and then wire Channel 1 connections to a D-Sub9 female plug. For internal connection example, check out the 1088XEL 0r 1088XLD page and download the schematics. |
Where internal installation is to be implemented, all Joystick related connections should be made behind in-line resistors so as to protect the PIC chip outputs from a direct short in the event that a Joystick were to be plugged in and toggled. An easy way to accomplish this would be to trace the Atari's Joystick pins to where they tie into a resistor on the motherboard, and then connect the opposite side of that resistor to the appropriate PIC chip I/O pin (see Pin-Out Chart above).
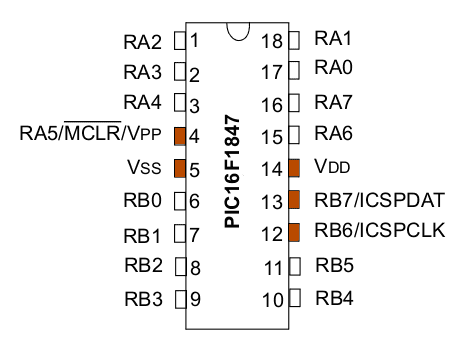
In Circuit Serial Programming Connections
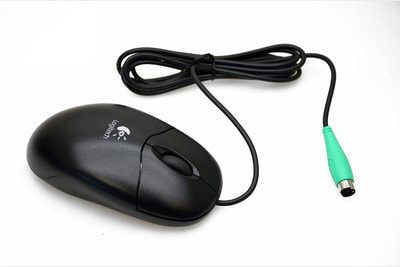
Best Mouse to use with MouseTARI --- Logitech M-SBF96
The M-SBF96 is a true optical mouse, with a resolution of 400 dpi. Usually found in black, but also available in a white (creme) color which is a better match for the XL or 1088XLD.
|
Programming the PIC MCU Chip
The MOUSETARI firmware needs to be programmed into the PIC MCU in order for it to become the MOUSETARI chip. To do this, you first need to download the zipped firmware file. It contains the FlowCode source, the Microchip Hex Machine Language file, and the Program Flashing ATR which can be used with the JOY2PIC programming adapter. The hex file is for use in a PIC programmer such as the PICkit3, or any programmer that can flash the PIC16F1847. However by far the easiest method is to use the Atari-JOY2PIC solution. In either case you will need to connect the programmer to the chip via its ICSP lines (there are 5 connections required --- see diagram). The JOY2PIC-STIK's ZIF socket makes this a cinch.
This firmware release is a fully working version which I feel is even closer to what the envisioned final version will be like, and incorporates a fix for one of the mouse button inputs not tri-stating when that channel was deselected. For the time being the resolution feature that was in some of the beta versions has been removed until such time that it can be implemented in a more proper way. However the feature where the Middle mouse button press sends a simultaneous Left+Right button press was retained. Hot Plugging now supported in a limited way, with a slight delay as it rediscovers that a mouse is present. Works with either 400 or 800 dpi mice, with the higher resolution creating a correspondingly faster movement. Here is the current MouseTARI Firmware (Still Beta)
| ||||
